# Micro DAGR

<span style="font-size: 24pt; font-family: Rajdhani, sans-serif; font-weight: bold; font-style: normal; font-variant: normal; text-decoration: none; vertical-align: baseline; white-space: pre-wrap;">[![logotipo_6@4x.png](https://wiki.squadalpha.es/uploads/images/gallery/2024-09/scaled-1680-/logotipo-6-at-4x.png)](https://wiki.squadalpha.es/uploads/images/gallery/2024-09/logotipo-6-at-4x.png)</span>

## <span style="font-size: 24pt; font-family: Rajdhani, sans-serif; font-weight: bold; font-style: normal; font-variant: normal; text-decoration: none; vertical-align: baseline; white-space: pre-wrap;">Introducción</span>

El micro DAGR es un receptor GPS avanzado utilizado por las fuerzas armadas para la navegación y el ajuste de fuego. Proporciona información precisa sobre la posición, la dirección y la velocidad, y puede ser utilizado para mejorar la eficacia en combate.

Aquí hay una lista de las características del MicroDAGR (en Arma 3):

- Brújula y rumbos
- Fecha y hora sincronizadas con la misión
- Elevación (por encima o por debajo del nivel del mar)
- Velocidad actual
- GPS con vista topográfica y satelital
- Creación, nombramiento y eliminación de waypoints
- El MicroDAGR también puede conectarse a tu vector para recuperar datos de él.

## <span style="font-size: 24pt; font-family: Rajdhani, sans-serif; font-weight: bold; font-style: normal; font-variant: normal; text-decoration: none; vertical-align: baseline; white-space: pre-wrap;">Acceso</span>

¿Cómo Sacar el Micro DAGR?

**1ª Opción**

- Interacción propia del ACE ("control" + "windows")&gt; Equipamiento &gt; Mostrar MicroDAGR.

**2ª Opción**  
  
Para dispositivos de este estilo (Micro DAGR, DAGR, ATRAX...) el ACE nos permite la interacción con ellos de la siguiente forma:

1. "**Inicio**": Muestra el dispositivo seleccionado.
2. "**Control**"+"**inicio**": Cierra el dispositivo seleccionado
3. "**Shift**"+"**inicio**": Cambia entre los dispositivos (Micro DAGR, DAGR, ATRAX, kestrel…)

La posición de MicroGR en la interfaz de usuario es la misma donde está tu GPS, puedes modificarlo en Opciones → Juego → Disposición. (**hay que reiniciar el juego tras modificar la posición**)

# <span style="font-size: 24pt; font-family: Rajdhani,sans-serif; color: #000000; background-color: transparent; font-weight: bold; font-style: normal; font-variant: normal; text-decoration: none; vertical-align: baseline; white-space: pre-wrap;">
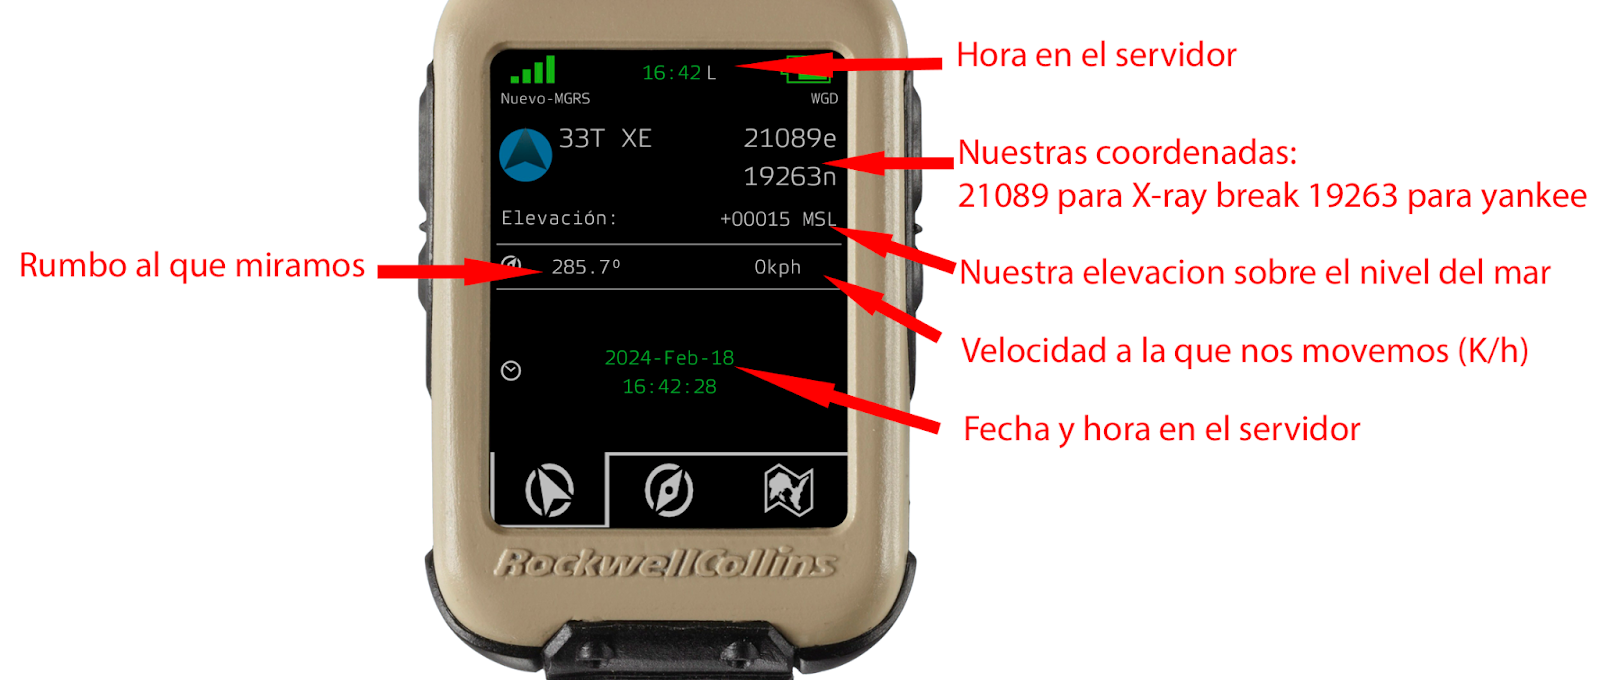
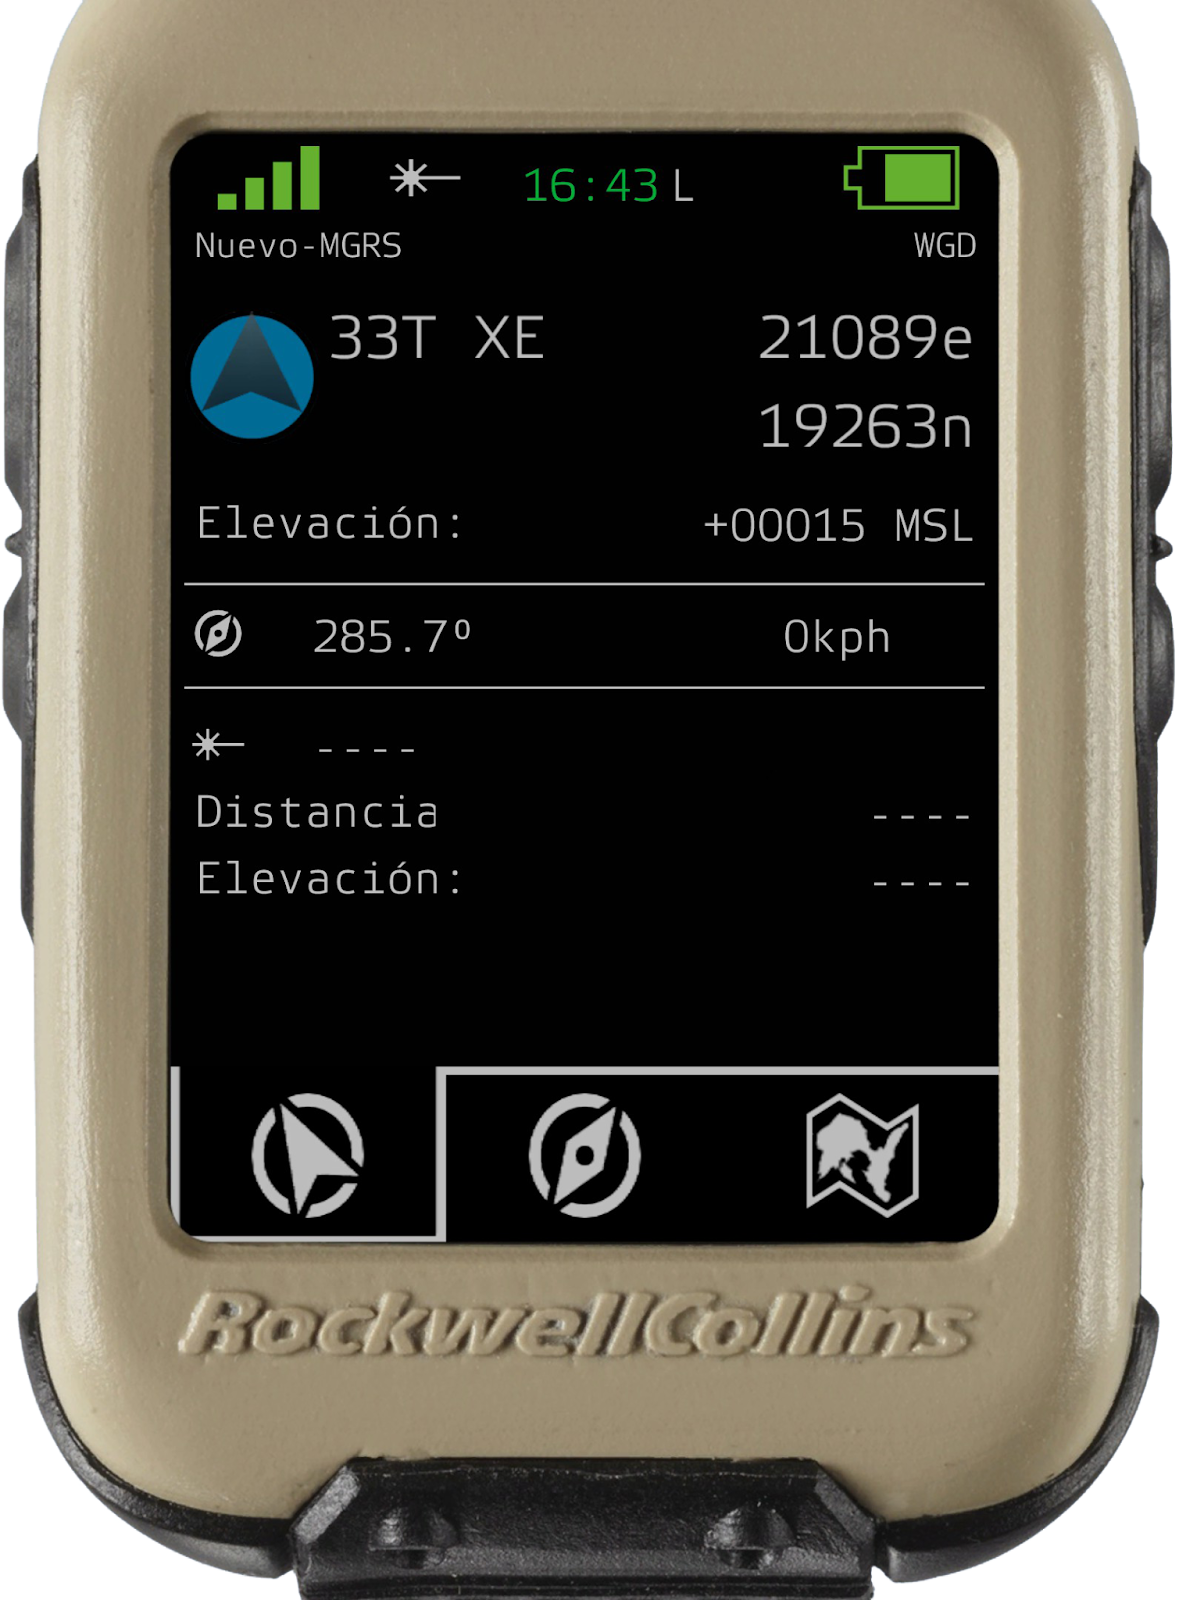
Ventana 1 - Información General</span>

<span style="font-size: 12pt; font-family: Rajdhani,sans-serif; color: #000000; background-color: transparent; font-weight: 400; font-style: normal; font-variant: normal; text-decoration: none; vertical-align: baseline; white-space: pre-wrap;">Esta es la ventana por defecto del Micro DAGR, en ella podemos ver información general:  
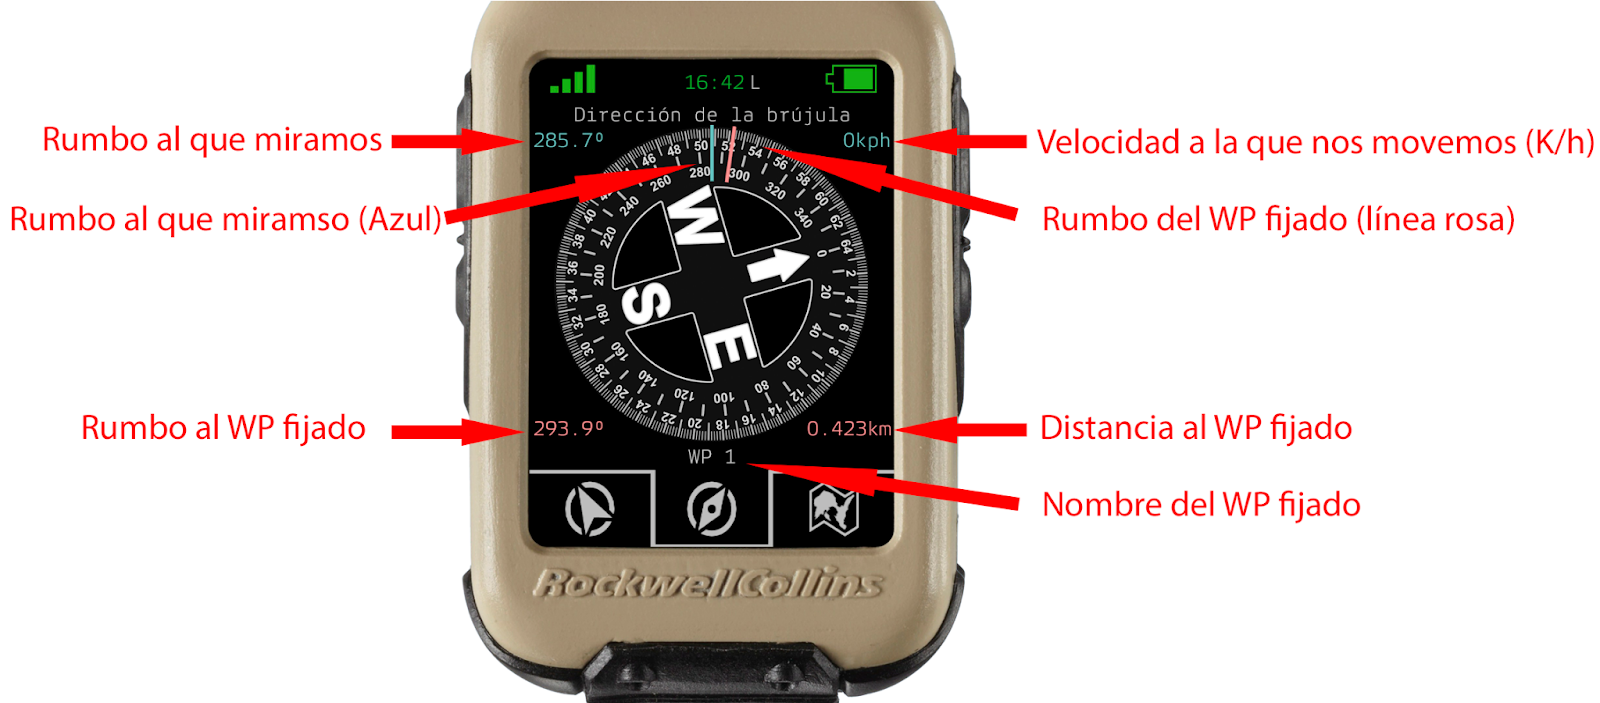
</span>

<span style="font-size: 12pt; font-family: Rajdhani,sans-serif; color: #000000; background-color: transparent; font-weight: 400; font-style: normal; font-variant: normal; text-decoration: none; vertical-align: baseline; white-space: pre-wrap;"><span style="border: none; display: inline-block; overflow: hidden; width: 643px; height: 273px;">![](https://lh7-rt.googleusercontent.com/docsz/AD_4nXecWi2d9HCaMy8OCzPEVVstbFZXLey5Fwpm7_g5zyMnMi4o-wwXbpvsLW1sTeoOV0FDIny6qgZWIGX-MuvXpK8SU8dpqR6e3alAgV7l7kyCXLc-JCEc0mbXce6_T4y9V3fBpuIzywd-0YXw1LUWrSk1MxF8?key=EgDr-C0RXbSKHiT-37fk9g)</span></span>

# <span style="font-size: 24pt; font-family: Rajdhani,sans-serif; color: #000000; background-color: transparent; font-weight: bold; font-style: normal; font-variant: normal; text-decoration: none; vertical-align: baseline; white-space: pre-wrap;">Ventana 2 - Brújula</span>

Se trata de la 2º imagen, en ella podemos ver una brújula que va girando, dejando siempre el rumbo en el que miramos, bajo la línea azul fija en la parte superior central.  
Si fijamos un WP o punto de ruta, saldrá una línea rosa fija en el rumbo del WP, y en la parte inferior se marcará también en rosa rumbo y distancia hasta el WP. Además en el centro, en color gris clarito saldrá el nombre del WP seleccionado.
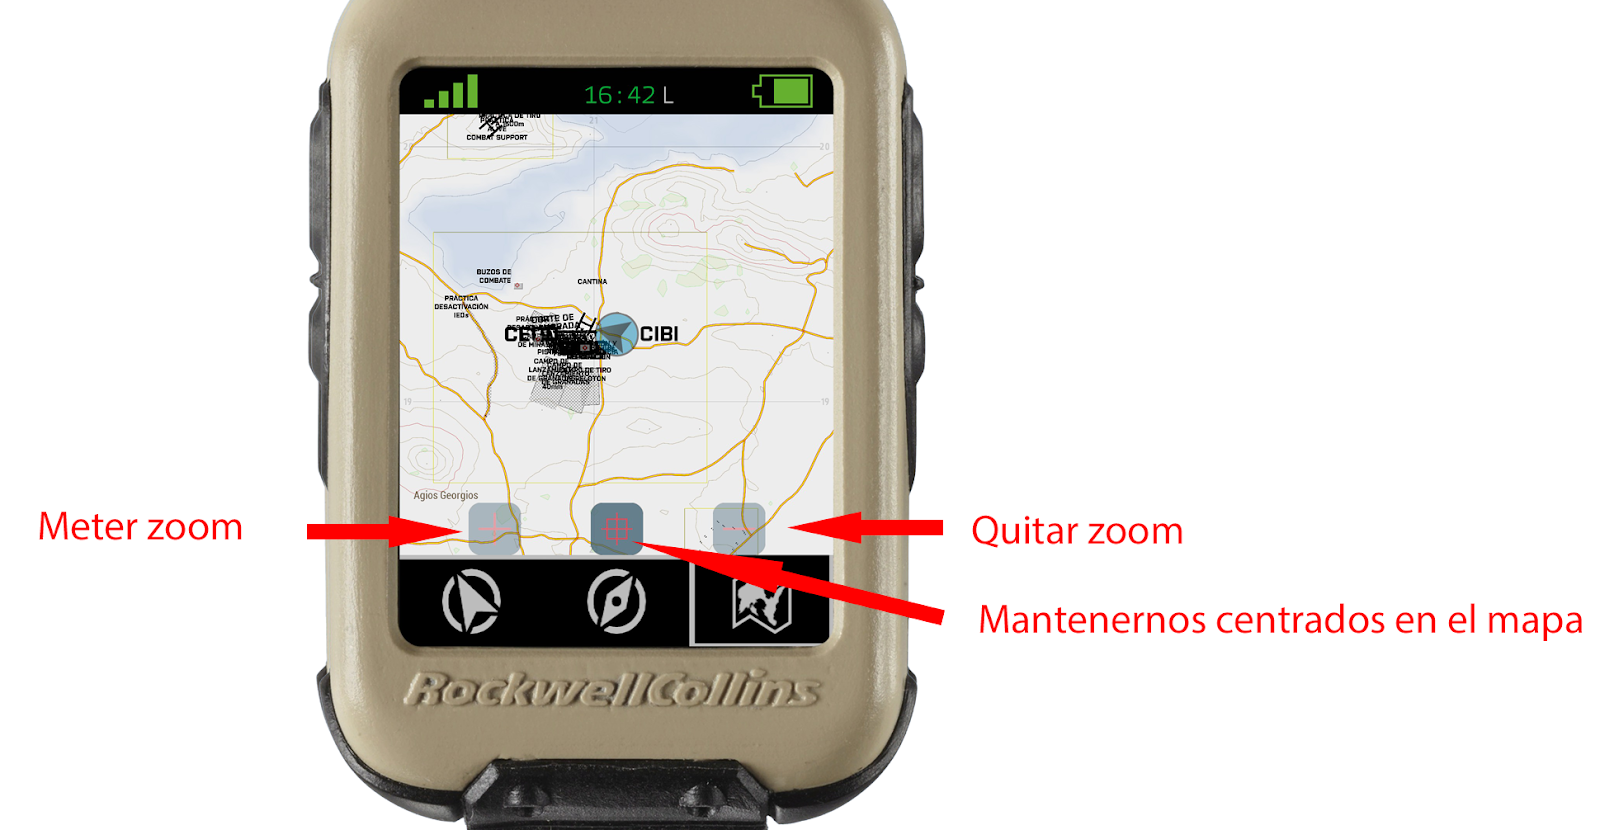
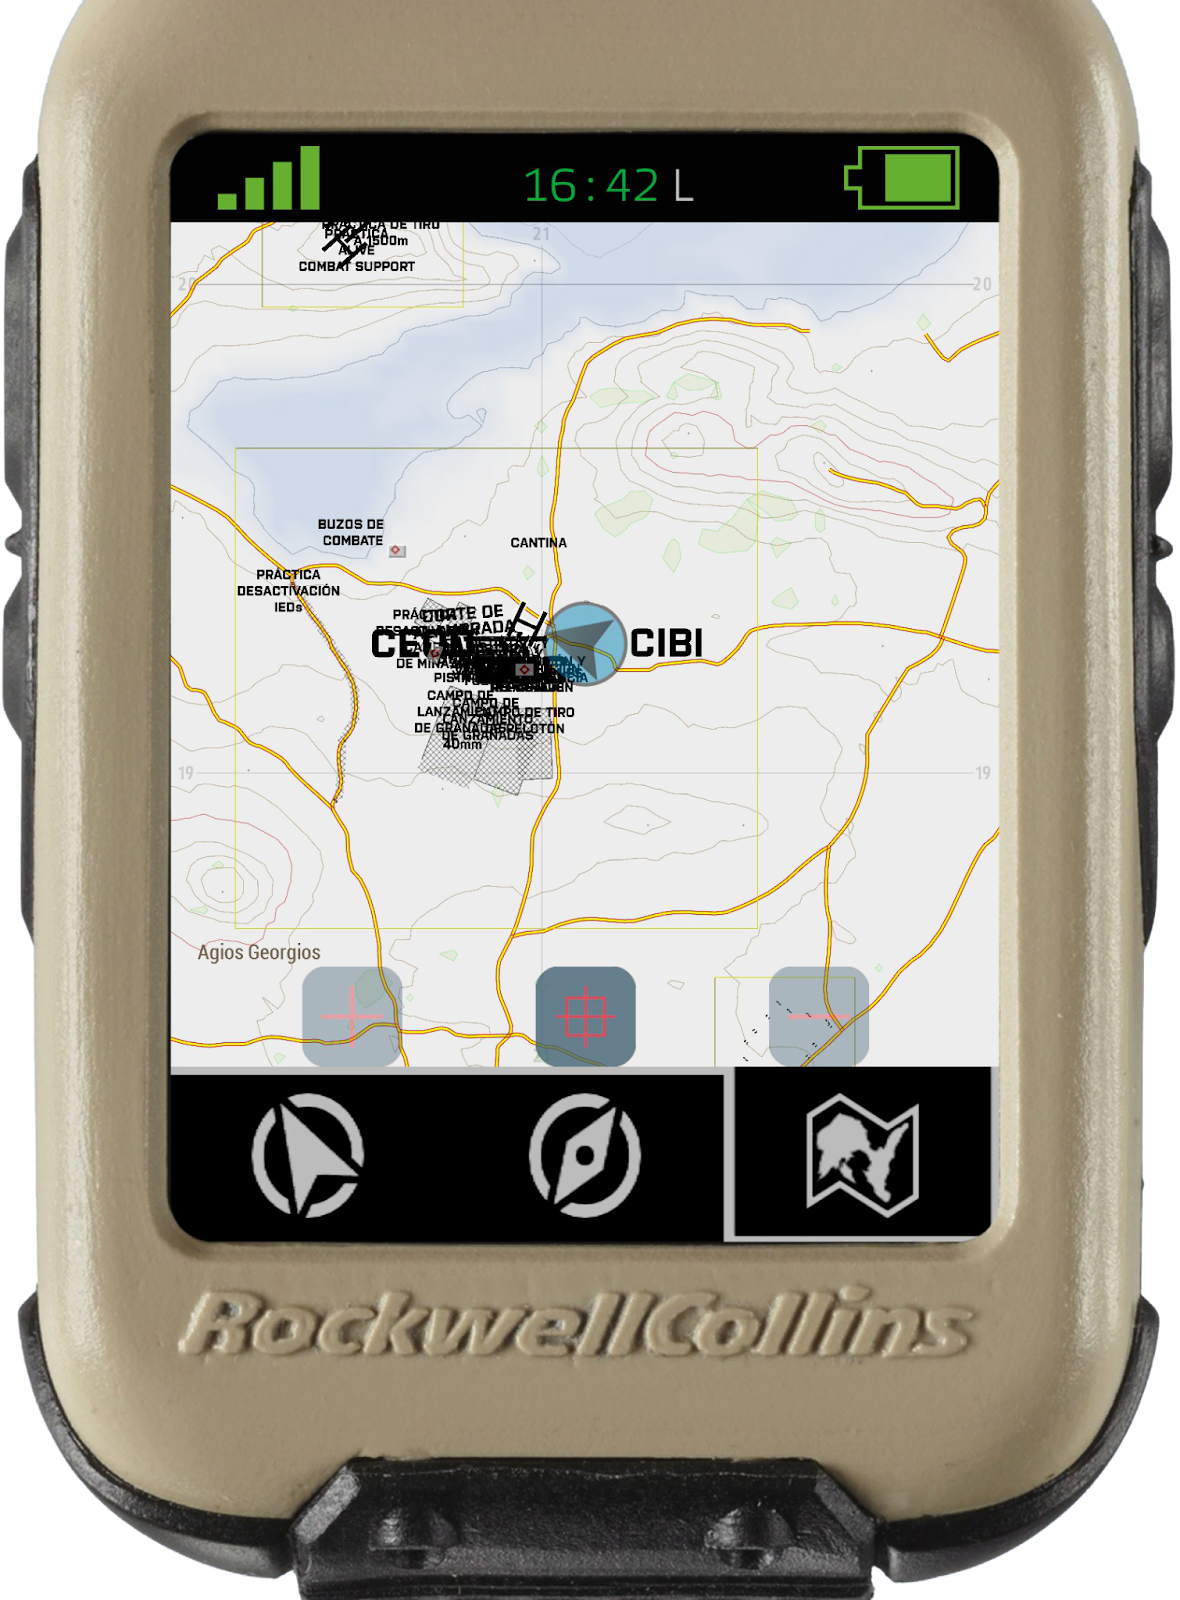
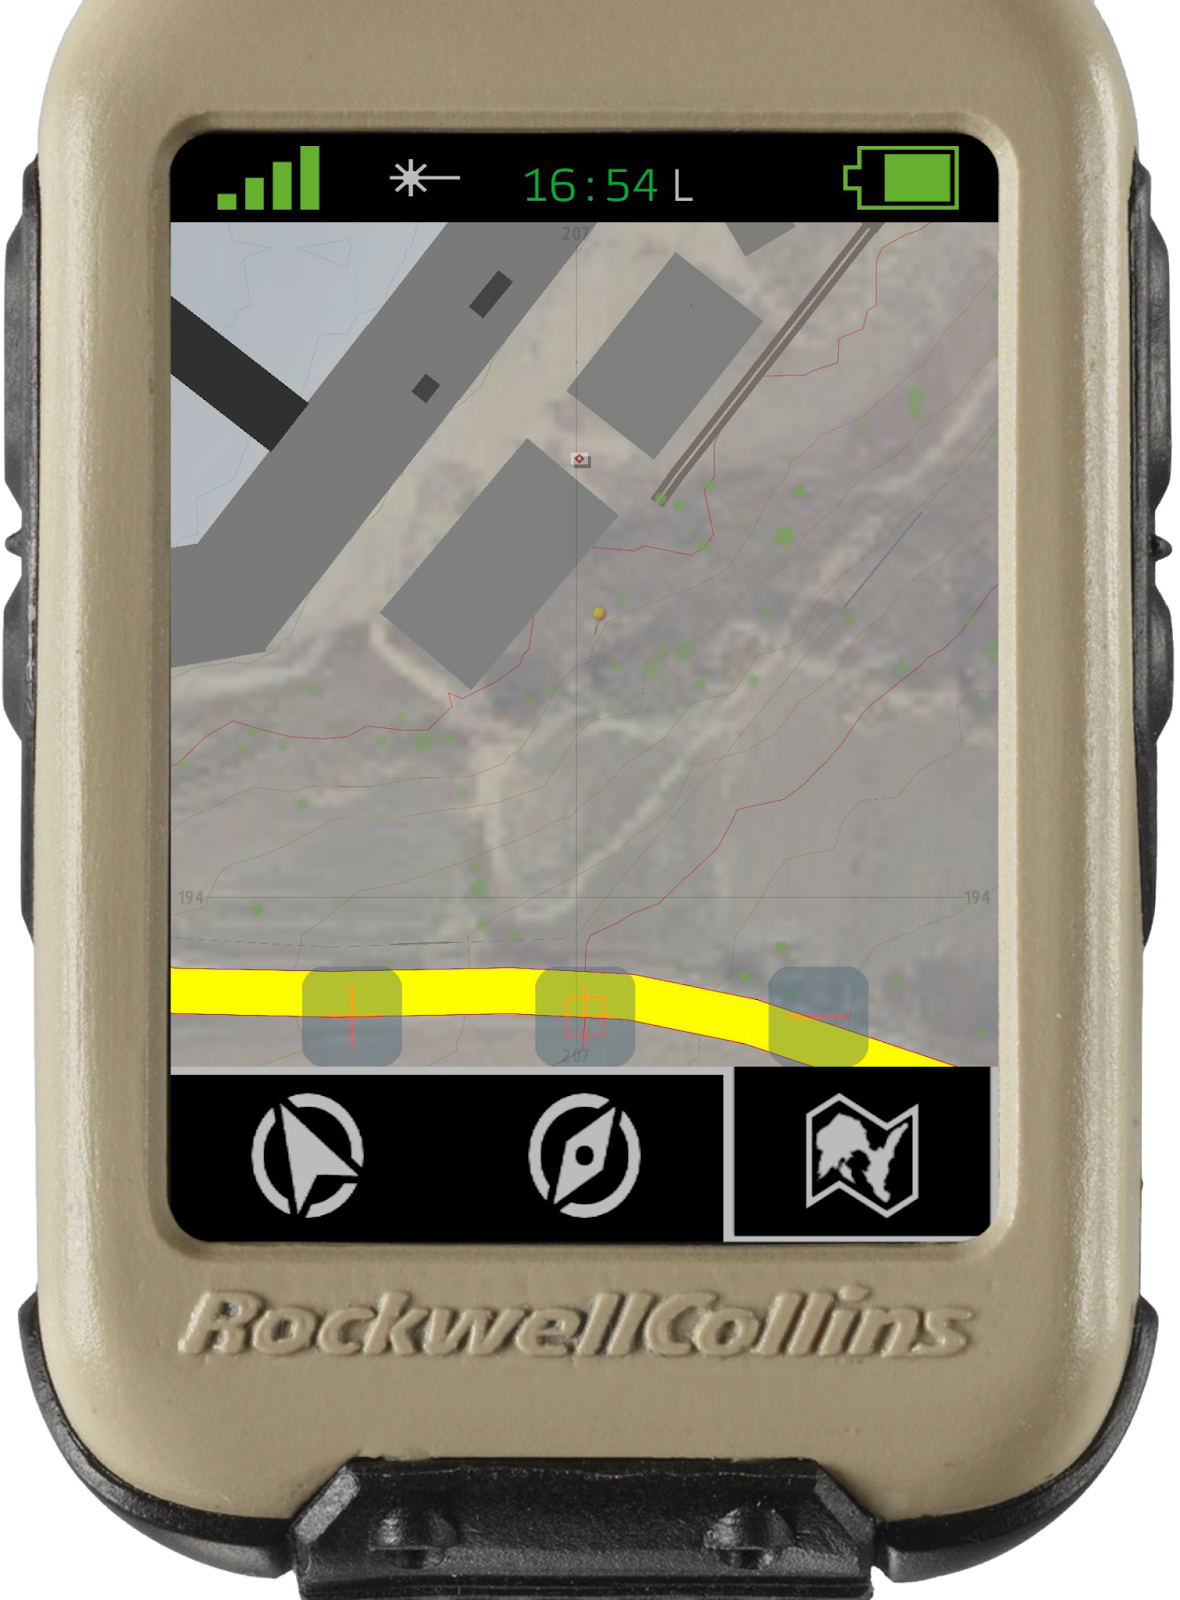
<span style="font-size: 12pt; font-family: Rajdhani,sans-serif; color: #000000; background-color: transparent; font-weight: 400; font-style: normal; font-variant: normal; text-decoration: none; vertical-align: baseline; white-space: pre-wrap;"><span style="border: none; display: inline-block; overflow: hidden; width: 643px; height: 283px;">![](https://lh7-rt.googleusercontent.com/docsz/AD_4nXf-GxXf0sV7QvzD9T_6Gf410FFfEi9s5voue7vPPfzHdJ310TMp3gyFrX1VQPGQPyJfekanLleSz0BhnSNC2rM1cSgbDYBEbMAOUXJDUEmhQMFjW2ZFr5F1F0NoKE4fOH8A3JUb9askuG2aalVqLRMYt2o?key=EgDr-C0RXbSKHiT-37fk9g)</span></span>

# <span style="font-size: 24pt; font-family: Rajdhani,sans-serif; color: #000000; background-color: transparent; font-weight: bold; font-style: normal; font-variant: normal; text-decoration: none; vertical-align: baseline; white-space: pre-wrap;">Ventana 3 - Mapa</span>

Esta pestaña nos permite ver el mapa, y las marcas/dibujos que se hayan indicado en él.   
Si pinchamos con el botón secundario en algún punto del mapa, y mantenemos pulsado, podremos movernos por el mapa, y con la ruleta del ratón meter o quitar zoom.

<span style="font-size: 12pt; font-family: Rajdhani,sans-serif; color: #000000; background-color: transparent; font-weight: 400; font-style: normal; font-variant: normal; text-decoration: none; vertical-align: baseline; white-space: pre-wrap;"><span style="border: none; display: inline-block; overflow: hidden; width: 567px; height: 294px;">![](https://lh7-rt.googleusercontent.com/docsz/AD_4nXdhQQAyVGxrCGdgiSgF5rcCkkHGZzgUbuntQSolhW-fnYQcbUs_HSybtijSqfgACMAUy2k1wqsEYkMePpPuy7Xt9_J1BT_R73IqjaRSPlTTeXnoiv78NxJ8B4ETiooM1I_uZSn7Njwf6PoPTiph8B-bsuAt?key=EgDr-C0RXbSKHiT-37fk9g)</span></span>

### Alternar entre vista topográfica y satélite:

1. Ir al menú del mapa
2. Haga clic en el botón primario del ratón en el menú del mapa nuevamente

<span style="font-size: 12pt; font-family: Rajdhani,sans-serif; color: #000000; background-color: transparent; font-weight: 400; font-style: normal; font-variant: normal; text-decoration: none; vertical-align: baseline; white-space: pre-wrap;"><span style="border: none; display: inline-block; overflow: hidden; width: 151px; height: 205px;">![](https://lh7-rt.googleusercontent.com/docsz/AD_4nXdnH9Y4bg0C18xVHUj98xQhnglCBOymZRBixnmAwZNa1Oek0FYMnVYQVxM39Wi916fb2OZhoMC5i_N09vZG4FpTsWNochNZjayopJ7h7aYE_ecAe5SkghuLDcTVzjMJY3kjS6sW6DSBHUjq8BT5Dx08Q4I?key=EgDr-C0RXbSKHiT-37fk9g)</span></span><span style="font-size: 12pt; font-family: Rajdhani,sans-serif; color: #000000; background-color: transparent; font-weight: 400; font-style: normal; font-variant: normal; text-decoration: none; vertical-align: baseline; white-space: pre-wrap;"><span style="border: none; display: inline-block; overflow: hidden; width: 151px; height: 205px;">![](https://lh7-rt.googleusercontent.com/docsz/AD_4nXd3ZUOZ3MWWyC4yyMMsPCQ-NDwHE7NxY3d7LiT88JMmjzU4EPd0RbfS4BfRslXd3IgvQ4aMkcJYdly8nyOn95_JY5SPZOw-3hDyM0RC6BAebZmxGI86yFWduXZ9NqqYmcptKfGcp4Lg00GYXczFjql7uS7o?key=EgDr-C0RXbSKHiT-37fk9g)</span></span>

# <span style="font-size: 24pt; font-family: Rajdhani,sans-serif; color: #000000; background-color: transparent; font-weight: bold; font-style: normal; font-variant: normal; text-decoration: none; vertical-align: baseline; white-space: pre-wrap;">Ventana 4 - Menú de configuración</span>

<span style="font-size: 12pt; font-family: Rajdhani,sans-serif; color: #000000; background-color: transparent; font-weight: bold; font-style: normal; font-variant: normal; text-decoration: none; vertical-align: baseline; white-space: pre-wrap;"><span style="border: none; display: inline-block; overflow: hidden; width: 151px; height: 205px;">![](https://lh7-rt.googleusercontent.com/docsz/AD_4nXdSu-3OxNoW9GBTwGIcPpXhhFFFeb8Gi5ffsJafsLlO7s1N7HLWFTaTr9I8n1Jq1f7X83bm5_ZAlpAGuXLQW3165-_3mutO_U0ImdEfY2X2see5nGnPIEijATOLAdq2T6-XePGQ5QSaAdOocrdxFn-klpUL?key=EgDr-C0RXbSKHiT-37fk9g)</span></span>

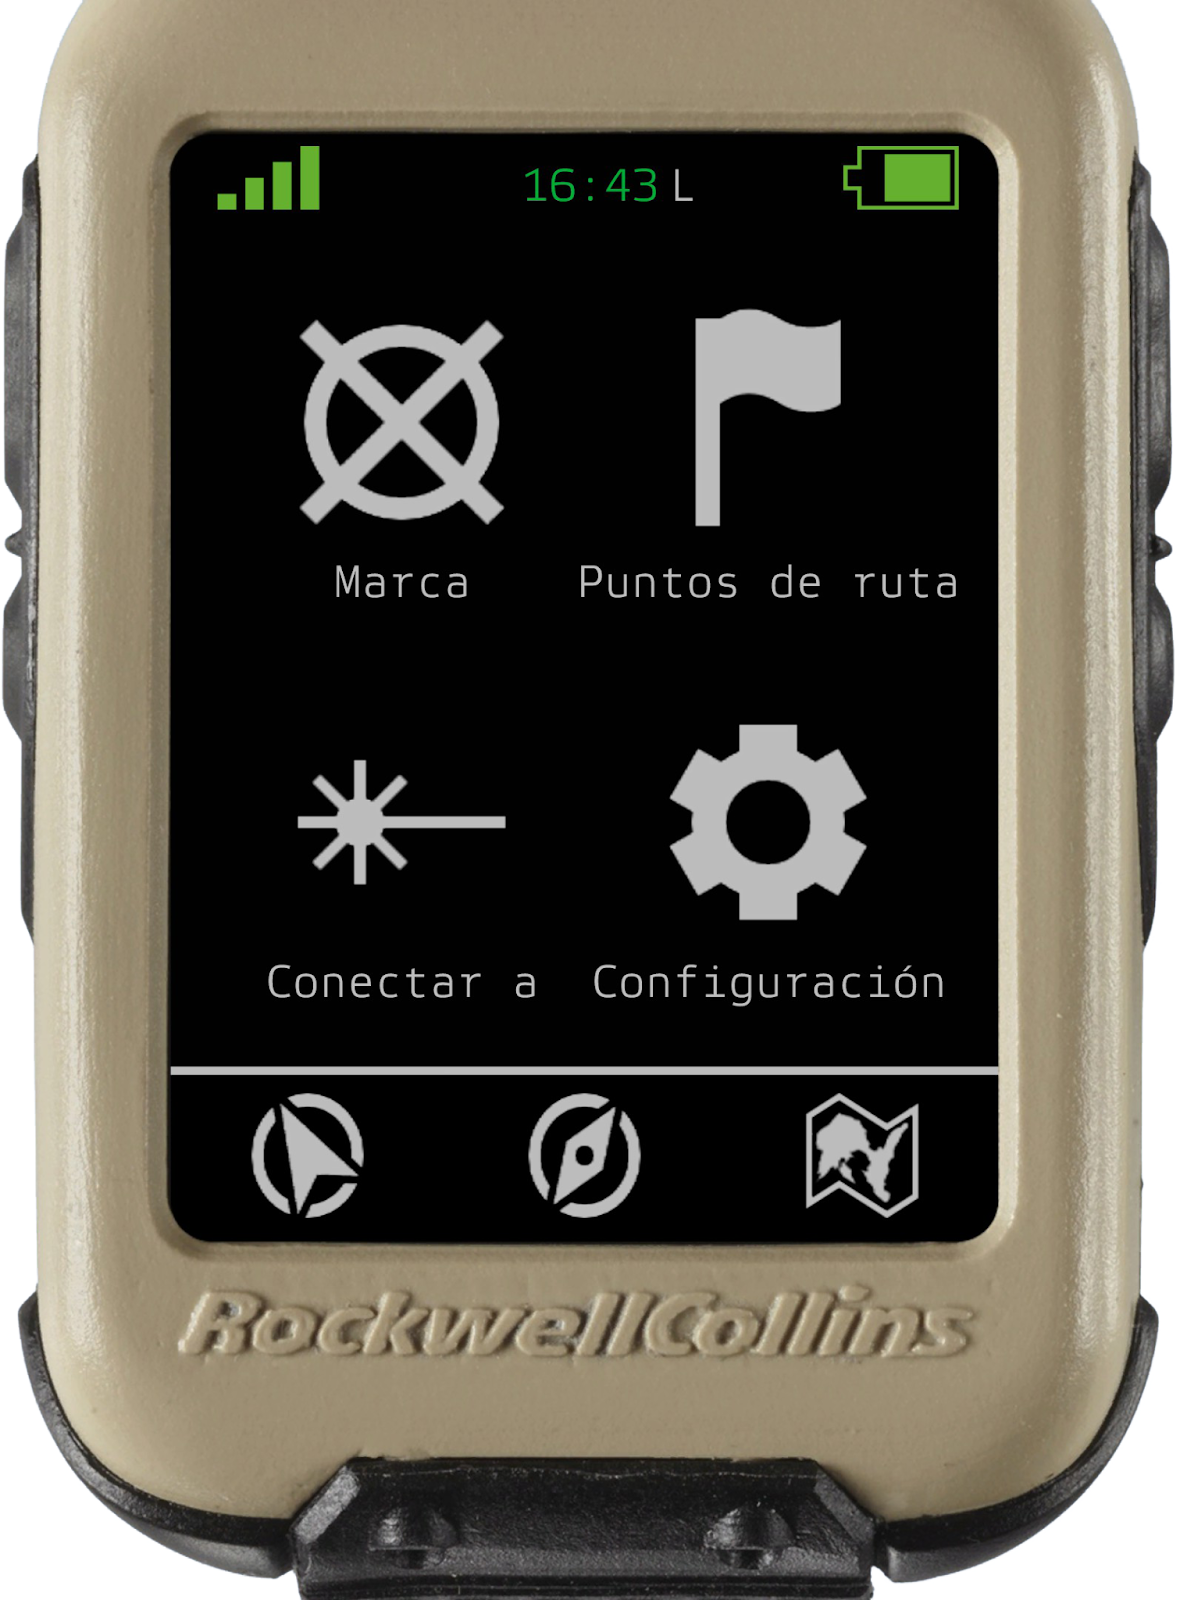
Si pinchamos en la parte superior de la pantalla (Cobertura, reloj o bateria), se abrira el menu de configuracion, desde el cual podemos configurar varias opciones:
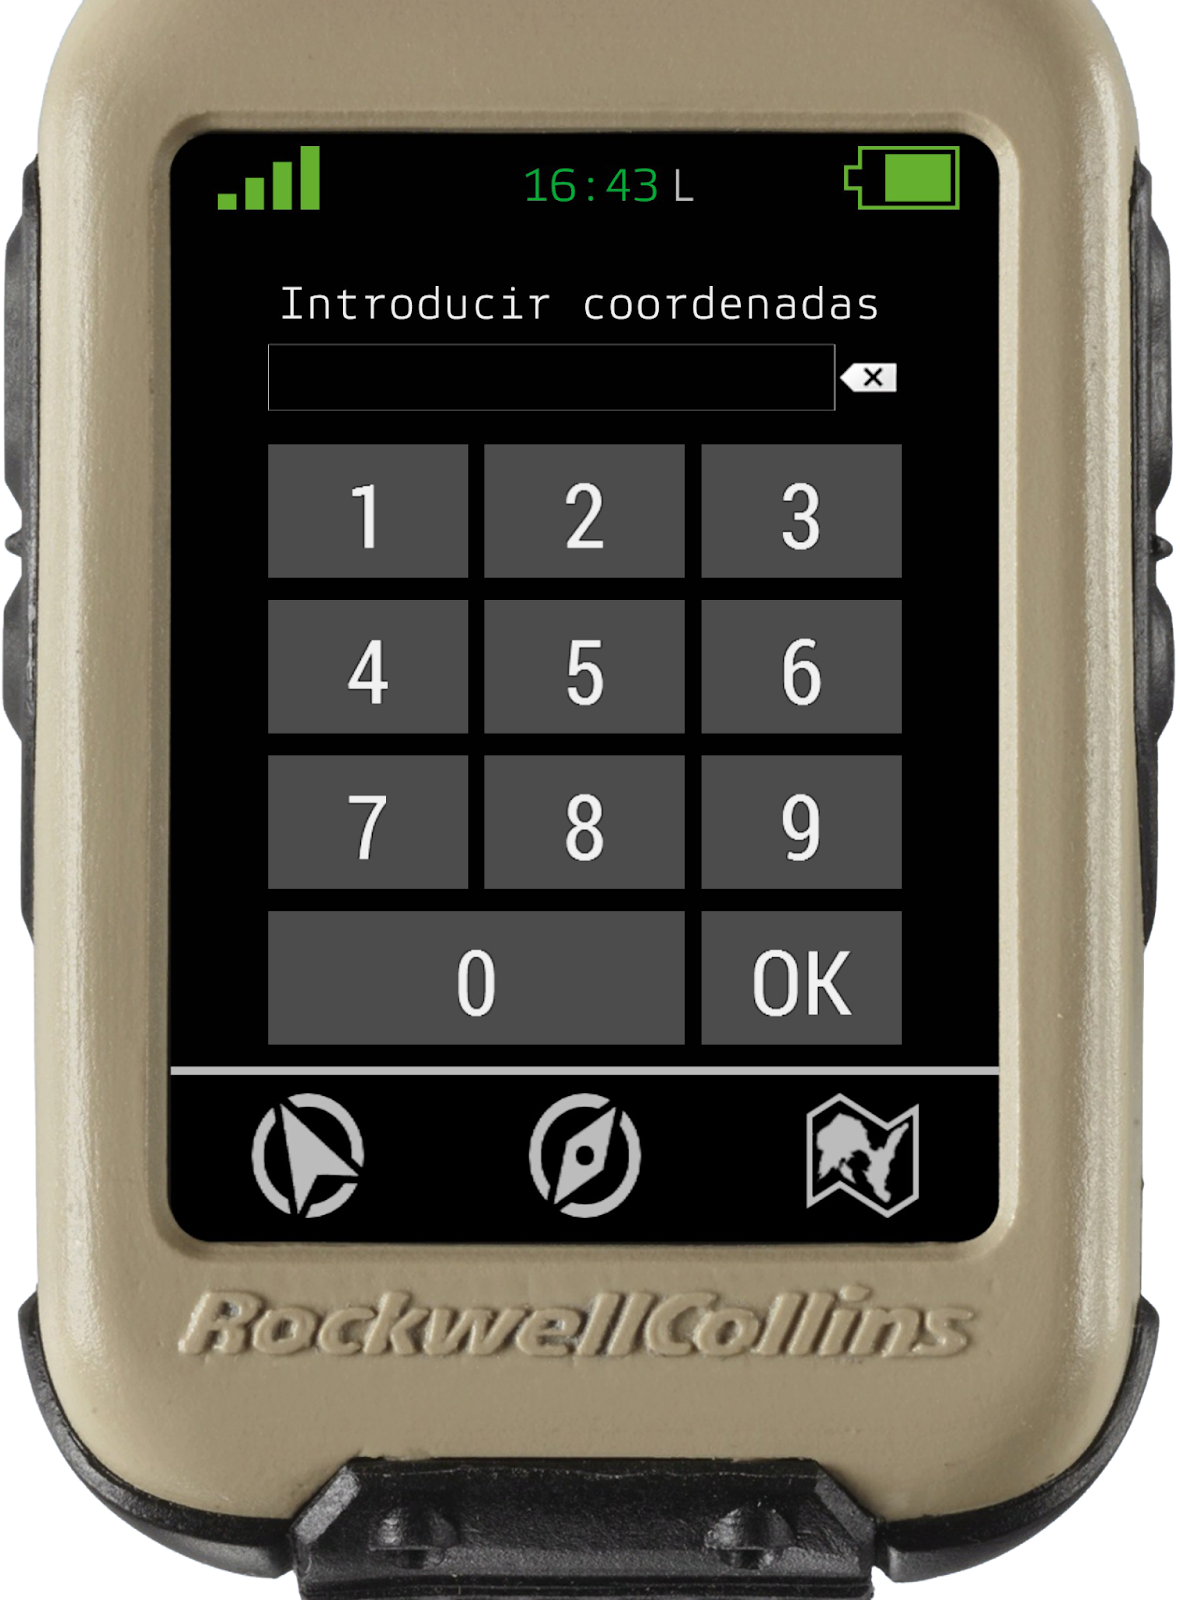
### Marca

  
Al pinchar en marca, nos sale un menú, en el cual podemos meter coordenadas bien con el teclado de nuestro PC, o pulsando con el ratón los botones de la pantalla.  
Una vez introducidas las coordenadas, si pulsamos con el ratón el botón “**OK**” nos guardara esa marca en la pestaña “**puntos de ruta**”
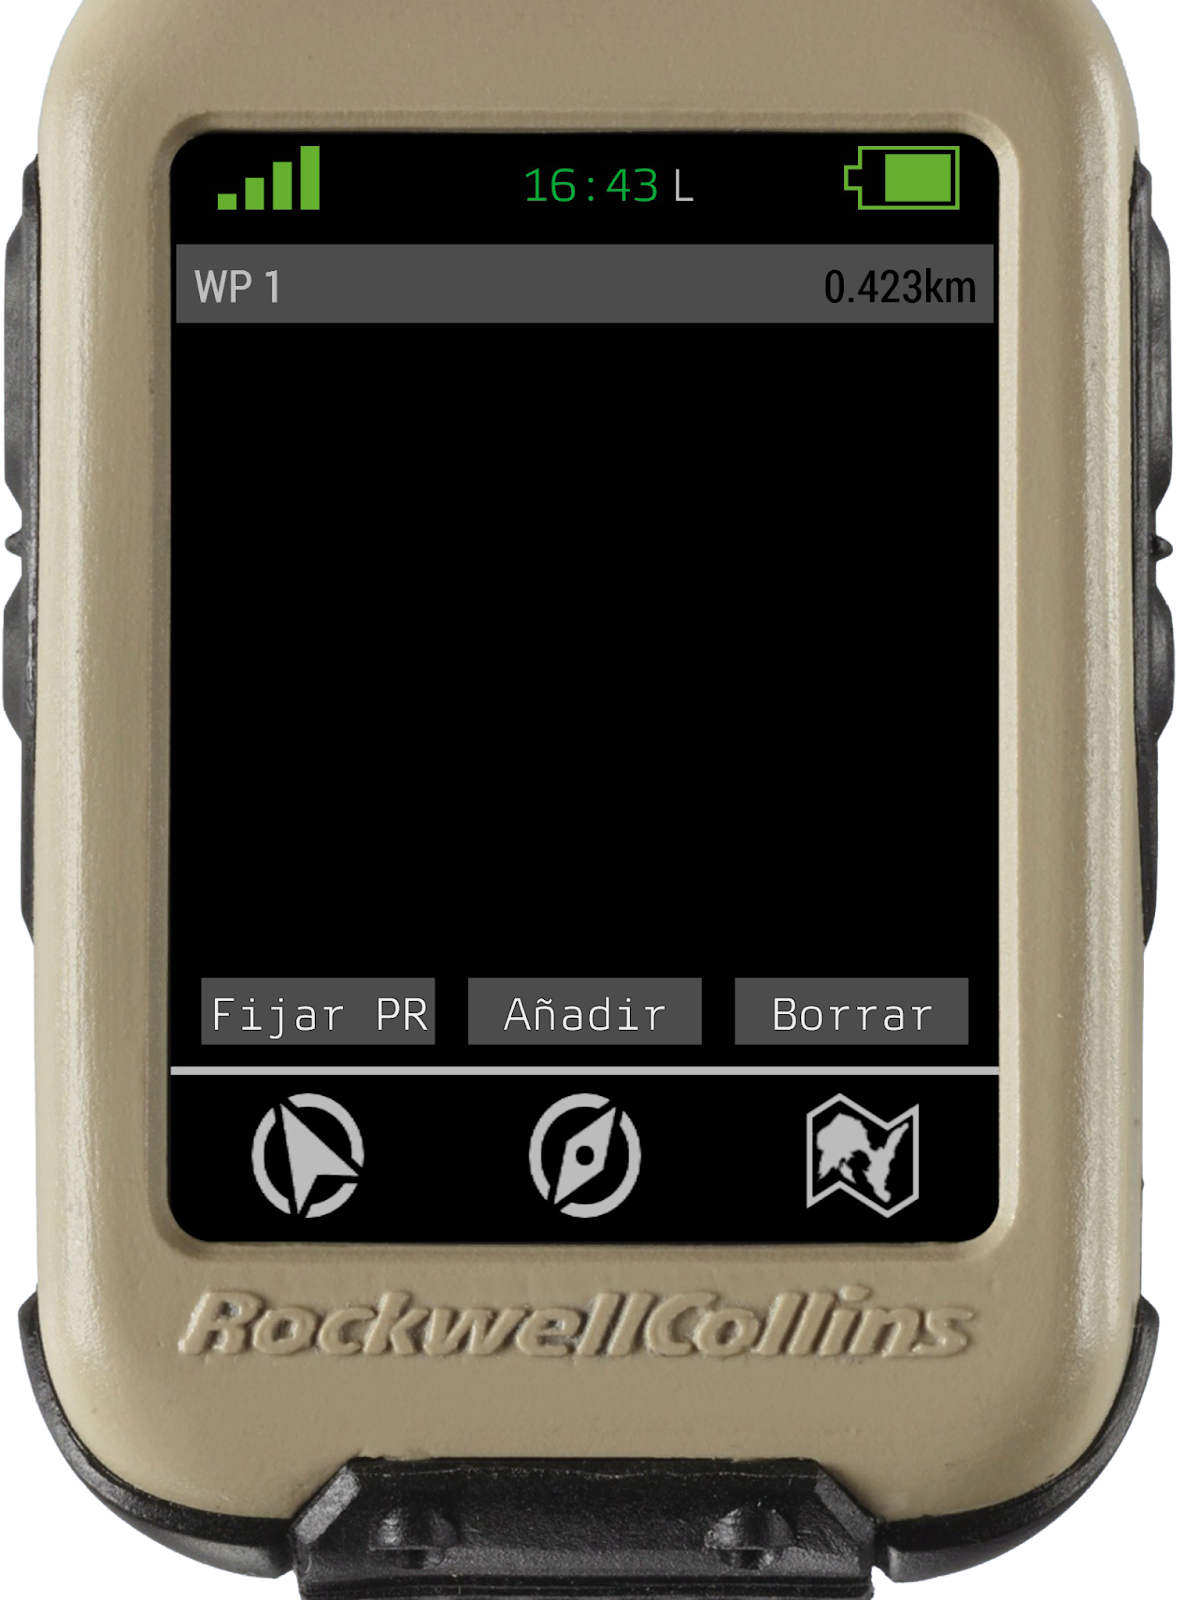
<span style="font-size: 12pt; font-family: Rajdhani,sans-serif; color: #000000; background-color: transparent; font-weight: 400; font-style: normal; font-variant: normal; text-decoration: none; vertical-align: baseline; white-space: pre-wrap;"><span style="border: none; display: inline-block; overflow: hidden; width: 151px; height: 205px;">![](https://lh7-rt.googleusercontent.com/docsz/AD_4nXfcI8KVOFXPbrtN_ii8sINVNoHwyZ1fpufZs2YSs0cpH8nfk9AH4kOfAdhkzTd1PMXRTI6xM7JCQjscN_4tHfWSDDkHCEfYC5sQ6_0K6Snt-Fzm9O40qtXQIJ1yad0v9ZabzlAkSSIuno1ZIrfbGXruY8U?key=EgDr-C0RXbSKHiT-37fk9g)</span></span>

### Puntos de ruta

  
En este apartado podemos crear y gestionar hasta un total de 5 puntos de ruta, los cuales nos saldrán identificados con el nombre asignado y la distancia a la que nos encontramos.

<span style="font-size: 12pt; font-family: Rajdhani,sans-serif; color: #000000; background-color: transparent; font-weight: 400; font-style: normal; font-variant: normal; text-decoration: none; vertical-align: baseline; white-space: pre-wrap;"><span style="border: none; display: inline-block; overflow: hidden; width: 151px; height: 205px;">![](https://lh7-rt.googleusercontent.com/docsz/AD_4nXdQAV8Al8n9BdWt4vMjmzDlPaGxsyH0z3ANrHeKvzDex-nYpm_V01CJIA1b5bIIwqUG3MHrn-QHcyGRGm7B39_EoftpIblVZ_RLrJoDeHCPYD6OHbsTxpEuS2yQJcw118uzDbCUqaH9WxPIHiS_lKNIeeY?key=EgDr-C0RXbSKHiT-37fk9g)</span></span>

#### Crear WP o puntos de ruta

  
Para crear puntos de ruta disponemos de 2 opciones:

**Por coordenadas:**

1. Desde el menú “marca” o desde el menú “puntos de ruta”
2. Pulsar “añadir” y meter las coordenadas deseadas.
3. Haz clic en fijar para que te salgan los datos del punto en la ventana de inicio y en la ventana de la brújula

**Sobre el mapa del GPS**

1. En la pestaña del mapa, pulsaremos 2 veces con el primario del ratón sobre el punto deseado y nos llevará a una ventana en la que saldrán arriba entre corchetes las coordenadas del punto, y un espacio en el que podremos escribir el nombre para ese WP.

<span style="font-size: 12pt; font-family: Rajdhani,sans-serif; color: #000000; background-color: transparent; font-weight: 400; font-style: normal; font-variant: normal; text-decoration: none; vertical-align: baseline; white-space: pre-wrap;"><span style="border: none; display: inline-block; overflow: hidden; width: 151px; height: 205px;">![](https://lh7-rt.googleusercontent.com/docsz/AD_4nXfJhqkIHTkH6b1Ulwif5j648WHdGvbt2B1LzlCVocY855ikAtR1B1bxDujJoWfxu9QfJcq9pu9KrJIUrxPcl3iV6ads31DzEuXqrQW50lsx1OqjI2Mm_Nps15y8ZZlzjONZdo4ZL8elMEzSmj3P23QHDKR8?key=EgDr-C0RXbSKHiT-37fk9g)</span></span><span style="font-size: 12pt; font-family: Rajdhani,sans-serif; color: #000000; background-color: transparent; font-weight: 400; font-style: normal; font-variant: normal; text-decoration: none; vertical-align: baseline; white-space: pre-wrap;"><span style="border: none; display: inline-block; overflow: hidden; width: 151px; height: 205px;">![](https://lh7-rt.googleusercontent.com/docsz/AD_4nXc9SMKdLxN7TYRysh_lrcwXAlQG6iGMQiRgXOz7UYN4uNcZofMA7dm5dRgTnaIf9AsPBkdTOmqlbaf0X_c7dPwXlEKLnraesN0nOtP14pVp3-6KoKjG2wj2iQXDTl1pNC2ygZU01MdpDbcc0NlqEI-HRkPU?key=EgDr-C0RXbSKHiT-37fk9g)</span></span>

#### Eliminar WP o puntos de ruta

En el menú de opciones, haz clic en Waypoints   
Selecciona el waypoint y haz clic en “borrar”.

### Cambiar unidades de medida

<span style="font-size: 12pt; font-family: Rajdhani,sans-serif; color: #000000; background-color: transparent; font-weight: 400; font-style: normal; font-variant: normal; text-decoration: none; vertical-align: baseline; white-space: pre-wrap;"><span style="border: none; display: inline-block; overflow: hidden; width: 189px; height: 256px;">![](https://lh7-rt.googleusercontent.com/docsz/AD_4nXeWxFnMSCvkqz9iSvhan4-WUnALo8y3G8dXvXVeiOW-9LtK9PHPAC-r2uvfuE3dK0MTXAWjrChYEdmWu8hfkeIr_cfo4Qlyl0JcTX4Ir_W67nnt3ZLlHlRBoSn9Oa9v-9EDhKXvKOGfHtnL65s29IM40GyP?key=EgDr-C0RXbSKHiT-37fk9g)</span></span>

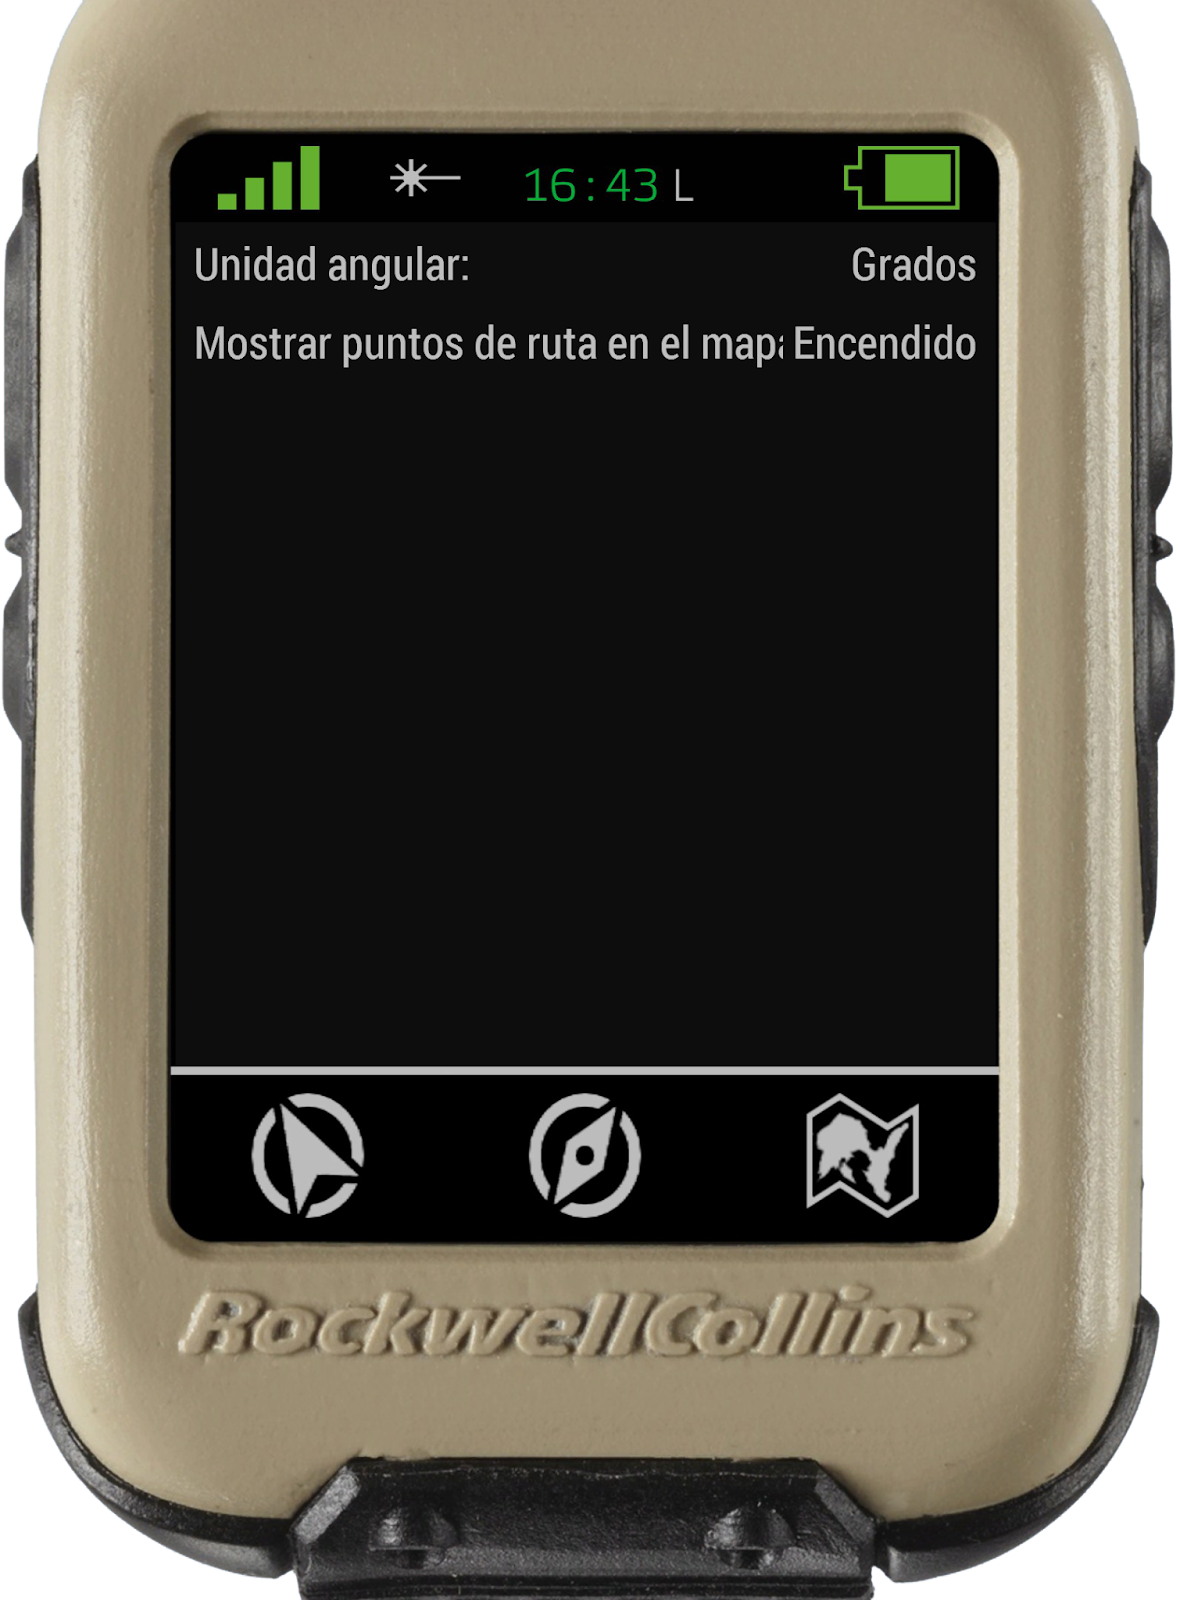
1. Ve al menú de opciones (haz clic en 1 área, arriba de la barra).
2. Haz clic en “**Configuración**”
3. Doble clic con el botón primario en la unidad al lado de la “unidad angular” esto permite alternar entre: 
    - Grados (sexadecimales \[un circulo = 360º\])
    - MILS (Miliradianes artilleros, que no matemáticos \[un círculo = 6.400 MILS\])
4. Doble clic con el botón primario en la unidad al lado de la “unidad angular”, el cual nos permite encender/apagar los puntos de ruta, es decir que se vean o no las “chinchetas en nuestra pantalla del Micro DAGR mostrando la posición exacta del punto de ruta.

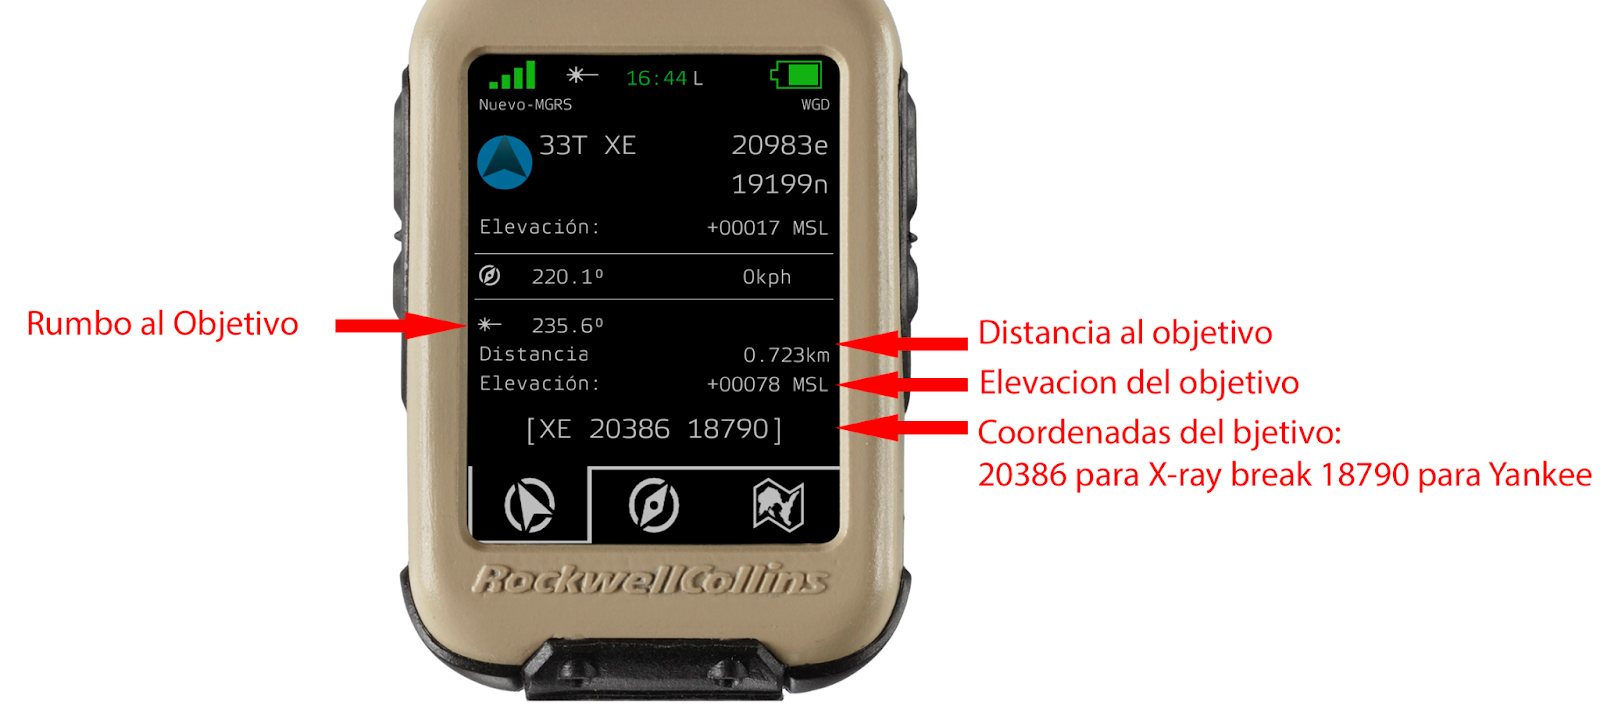
### Conectar a Vector 21

  
El GPS Micro DAGR, nos permite una conexión directa con el telemetro Vector 21, lo cual nos permite obtener en el Micro DAGR, información sobre el punto al que miramos con el Vector 21 (coordenadas, distancia, altitud sobre el nivel del mar…)

1. Para esto necesitas un Vector 21.
2. Ve al menú de opciones (haz clic en el área de, arriba de la barra).  
       
    <span id="bkmrk--24" style="font-size: 12pt; font-family: Rajdhani,sans-serif; color: #000000; background-color: transparent; font-weight: 400; font-style: normal; font-variant: normal; text-decoration: none; vertical-align: baseline; white-space: pre-wrap;"><span style="border: none; display: inline-block; overflow: hidden; width: 113px; height: 154px;">![](https://lh7-rt.googleusercontent.com/docsz/AD_4nXfFj1MndJo2kepd3gsP7nAoZKu8Koqttz_T9Ajq3IAA1OLVq6oxZQI47irTY-asgOX9ZzK272S4m3hslUGC7gXlGTXDmwtcFdo_jQKwYKpSpQIEtSZrM-QopxD4cOYKxTYAQSoPbPsRbf1oSEKd0XT6Xb3X?key=EgDr-C0RXbSKHiT-37fk9g)</span></span>
3. Haz clic en “Connect to”, pasarás a la siguiente pantalla.  
      
    <span id="bkmrk--25" style="font-size: 12pt; font-family: Rajdhani,sans-serif; color: #000000; background-color: transparent; font-weight: 400; font-style: normal; font-variant: normal; text-decoration: none; vertical-align: baseline; white-space: pre-wrap;"><span style="border: none; display: inline-block; overflow: hidden; width: 113px; height: 154px;">![](https://lh7-rt.googleusercontent.com/docsz/AD_4nXcUOzxPwurtvfRA2aYtqz8185-gbwKmA1_NOixtlXhmUPxpg7sDKm03eaCTIVJ1_1h2rUvWKyaoJp-KlioP-eZ2LeJSrqSX_VyNrZEvrJ3euPqT8vhgBruvvScYYAy6MyWuMxCsx2BnlbKOKQ5LCC6zsYp4?key=EgDr-C0RXbSKHiT-37fk9g)  
    </span></span>
4. Saca tu Vector 21.
5. Mantén presionadas "R" y "TAB" hasta que aparezca el círculo rojo que señala.
6. Mantén el círculo sobre el objeto y suelta ambas teclas.
7. Los datos en el menú principal del Micro DAGR ahora muestran en la parte inferior de la pantalla los datos del objetivo que hemos seleccionado.

<span style="font-size: 12pt; font-family: Rajdhani,sans-serif; color: #000000; background-color: transparent; font-weight: 400; font-style: normal; font-variant: normal; text-decoration: none; vertical-align: baseline; white-space: pre-wrap;"><span style="border: none; display: inline-block; overflow: hidden; width: 567px; height: 249px;">![](https://lh7-rt.googleusercontent.com/docsz/AD_4nXcGUfukA6DKGefYzCuS6cW1bRm1RqQ9NeClAFy11sd-xZWQe8XOxTboqq7TZguyWFxSzMulIUZi93RGD4OMcjPQLe07-WHJJYVnhd57RefTn7BVr0rGSebb74ypkYv1pPNS-XKhle1ZJxfpFUES4nQj-bqP?key=EgDr-C0RXbSKHiT-37fk9g)</span></span>

# <span style="font-size: 24pt; font-family: Rajdhani,sans-serif; color: #000000; background-color: transparent; font-weight: bold; font-style: normal; font-variant: normal; text-decoration: none; vertical-align: baseline; white-space: pre-wrap;">Video tutoriales</span>

<span style="font-size: 12pt; font-family: Rajdhani,sans-serif; color: #000000; background-color: transparent; font-weight: 400; font-style: normal; font-variant: normal; text-decoration: none; vertical-align: baseline; white-space: pre-wrap;">A continuación dejo los enlaces a algunos videotutoriales en los que se puede ver todo lo anterior:</span>

<span style="font-size: 12pt; font-family: Rajdhani,sans-serif; color: #000000; background-color: transparent; font-weight: bold; font-style: normal; font-variant: normal; text-decoration: none; vertical-align: baseline; white-space: pre-wrap;">Diablo: </span>[<span style="font-size: 12pt; font-family: Rajdhani,sans-serif; color: #1155cc; background-color: transparent; font-weight: bold; font-style: normal; font-variant: normal; text-decoration: underline; -webkit-text-decoration-skip: none; text-decoration-skip-ink: none; vertical-align: baseline; white-space: pre-wrap;">GPS Micro DAGR</span>](https://youtu.be/3ejq-t8Ak2E?si=iTF-MXh5HLZ70JSm)

<span style="font-size: 12pt; font-family: Rajdhani,sans-serif; color: #000000; background-color: transparent; font-weight: bold; font-style: normal; font-variant: normal; text-decoration: none; vertical-align: baseline; white-space: pre-wrap;">Rotciv</span><span style="font-size: 12pt; font-family: Rajdhani,sans-serif; color: #000000; background-color: transparent; font-weight: 400; font-style: normal; font-variant: normal; text-decoration: none; vertical-align: baseline; white-space: pre-wrap;">: </span>[<span style="font-size: 12pt; font-family: Rajdhani,sans-serif; color: #1155cc; background-color: transparent; font-weight: bold; font-style: normal; font-variant: normal; text-decoration: underline; -webkit-text-decoration-skip: none; text-decoration-skip-ink: none; vertical-align: baseline; white-space: pre-wrap;">GPS Micro DAGR</span>](https://youtu.be/t4DzQZAxcyE?si=sfcsxrvjDqrGkNoF)